Using the Parenting by Numbers™ Behavioral Management System
Getting Started
Step
1 – Log in to the system. You should have received an email with a link to the log in page of
the system along with your 10-digit ID and temporary password. Click on the link
in the Email or go to this address in your browser. Enter your ID in the
Caregiver ID box and Password in the box below. Click the Login button. Please
wait a few seconds for the next page to appear. If this is the first time you
have logged in, you will go to a page asking you to agree to the terms of use
before you will be granted access to the system. Your password is temporary and
may be changed along with your PIN code (used for telephone features).
Step
2 – Select the client (may only be one). Do this by clicking the check box to the left of
the client’s (child) name. Then click the button “Go to patient’s file”.
Step
3 – Check out the various options and screens to get familiar with the system. You will be directed to the
“View Account Detail” screen.
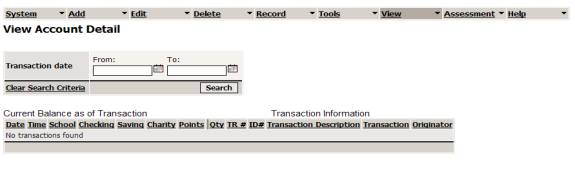
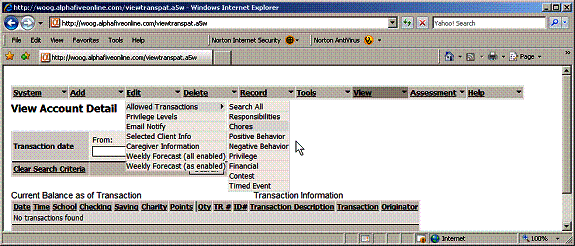
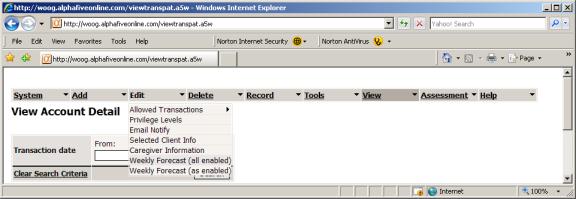
If this is your first time logging in, there may not be any transactions found. At the top of the screen you will see a number of menu items – system, add, edit, delete. If you click on these items, a menu bar will appear below it as shown below.

For
some menu items that drop down, there may be further submenus (ones with black
triangles). Click on the various top menu selections to see the available
options.
Basic
Concepts
The
BMS is similar to on-line banking with multiple accounts that are Points,
Checking, Savings and Charity. These account are not tied to any real bank
accounts, they simply help account for your child’s points and the financial
balances with the parents/primary caregivers. Points are the tokens of this
home economy that parents use to “sell” privileges to their child. Under
this system, there should be no loans. If they don’t have the points, they
can’t purchase the privilege. The client earns points for responsibilities,
chores and positive behaviors and loses points when purchasing privileges and
exhibiting negative behaviors. Dollars (optionally) are applied to the various
accounts with an allowance or through money earned and saved. Dollars are
deducted when the child requests money or to pay for expenses incurred through
loss or accident (i.e. child loses cell phone). In order to create this token economy, the primary caregivers
working with their clinician performed an initial assessment. This assessment
automatically added the elements of the token economy. These elements are
called “Allowed Transactions”.
Allowed
Transactions
These
are predefined items in the client’s file that can be recorded as a transaction
that may affect their point or dollar account balances. These items can be used to record behaviors,
privileges or can serve various administrative uses. Allowed transactions can be added, copied from a built-in
library, edited or deleted. Only Allowed
transactions can be recorded (hence the name “Allowed”), although the content
of the transaction can be edited prior to it being recorded.
Editing Allowed
Transactions
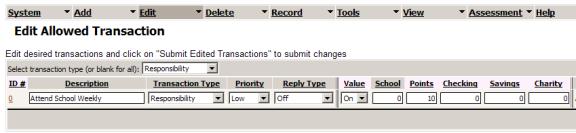
Allowed
Transactions appear like the pictures below (only 1 Allowed Transaction shown)
when the Edit =>Allowed Transactions =>Responsibility is selected
using the top menu bar:
The
screen shown above is only the tip of the iceberg. Many more elements of the
Allowed Transaction appear to the right if you move the scroll bar to the
right. Notice in the picture above
there are many fields or boxes that can be edited. These are the Description, Transaction Type, Priority, Reply
Type, Value and the entries for School, Points, Checking, Savings and Charity.
Clicking the number in the ID# field opens up a new window providing the
ability to edit the selected Allowed Transaction in greater detail. For
convenience you may edit and update multiple transactions with a single click
of the “Submit Edited Transactions” button on the far right bottom of the
editing window.

Allowed Transaction
Field Definitions
The following section defines the fields of the
Allowed Transaction.
Description: Short description of the Allowed Transaction.
Transaction Type: Select the appropriate type for
classification and operating purposes.
Responsibility - Activities for which Patient is expected
to perform unconditionally such as going to school, doing
homework, etc.
Chore - Activity for which Patient has some choice or
for which performing the task includes rewards
Positive Behavior - Behaviors for which caregivers desire
to see increased or maintained
Negative Behavior - Behaviors for which caregivers desire to see
reduced
Privilege - Anything provided by caregivers to Patient
beyond required by law. Examples include allowance, toys, games, going out
with friends, transportation, driving privileges, computer use, video
games, upgraded or desired clothing, etc.
Email Notify - This transaction type,
when Scheduled will automatically notify by email caregivers or
patients at a preset time and/or date.
Financial (not available to all Caregivers): These
transactions are used to report on or adjust the various fictitious
accounts including Checking, Saving, Charity, School and Points.
Timed Event (not available to all Caregivers): This transaction
allows the use of email or text messaging to serve as a time clock to record
the elapsed time between subsequent messages. This can be used
to easily record the amount of time is spent on an
activity. When the transaction contains a value, the amount
of time (ie. hours worked) will be multiplied by the value (pay rate) for a
total value (i.e. money earned).
Priority: The relative priority of this
allowed transaction to the primary caregivers ranging from Low to Critical.
Reply Type: This defines the response transactions entered by email or text
messaging. If set to Off, no reply of the account balances (points, dollars) is
returned when the transaction is received. Other settings including:
Confirm, Dollars (reply with balances of Checking, Saving and Charity
Accounts), Points (reply with Points balance), School (School points
balance), Remind (do not record transaction, simply send a Reminder to the
Email address specified in Email Notify 1).
Using
the mouse to scroll the screen to the right, you will see the next fields of
this Allowed Transaction.

These
fields are used to define the schedule for the transaction.
Scheduled
Day – The
day of the week, days of week, day of month selected to define when this
behavior or transaction is scheduled to occur. This information is used in the
Weekly Schedule report and can be used to automate the recording of the
transaction if the Scheduled Action is enabled. Select from many options using the drop down box.
Scheduled
Action -
The automated schedule can be turned off or can be assigned to automatically
apply (Apply Transaction in the Scheduled Action field) on the Scheduled Day
after the Start Date (if defined) and that Scheduled Time (if not defined, it
will be recorded at within 2-3 hours of midnight). This example demonstrates that an “Attend School Weekly” Responsibility transaction will be
automatically recorded each Friday. Since the transaction had a point value of
10, 10 points will be automatically added to the client’s account balance and a
transaction will appear in the clients account at that time. The Scheduled Action can also be set to
serve as a reminder that the transaction has not been recorded within a certain
number of days. In this case instead of being recorded, a reminder Email is
sent. The content of the “Notes” field of the Allowed Transaction will be
included in the body of this Email.
Check for Recorded
Transactions - If the Allowed Transaction is an “Email Reminder” AND the
Scheduled Action is set to a Reminder: xx days, the transaction is not recorded
but instead will check to see if the specified caregiver has recorded a
transaction within the specified number “xx” days. If not, the specified
caregiver will be sent an email with the body including the contents of the
“Notes / Data” field of the transaction.
Start
Date – If a
date is entered in this field, this is the earliest date the automated schedule
can occur. If the Scheduled Day is set to “Once” the transaction is recorded
only once on this date. When updating transactions to occur, for example after
school starts again after summer, simply set the value to the appropriate date
after the fist week of school.
Scheduled
Time – This
the time of day the transaction is to be scheduled. This is important when
organizing a child’s schedule. If a time is specified, it will appear in its
appropriate spot in the child’s “Schedule Chart”. The Schedule Chart, a weekly
calendar, lists the activities scheduled as chores, responsibilities and
privileges. If the Scheduled Action is
set to “Apply Transaction”, the transaction will be automatically recorded
and/or emails (text messages) sent at that time (within a few minutes).
Scroll
the screen further to the right to see additional fields of the Allowed
Transaction. 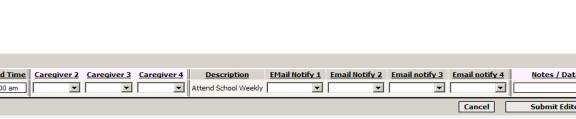
You
will see two different sets of fields. One set allows the setting of which
caregivers are authorized to record the transaction. Parents have access to
almost all allowed transactions but other caregivers may be limited to seeing
transactions for which they are authorized to record. The Email Notify fields
1-4 define who will be notified (Caregivers or client) automatically when the
transaction is recorded. Note that it
is not necessary to set a caregiver to notify. Only caregivers authorized can
be notified regarding these transactions.
Caregiver
1-4 – These
are the caregivers (drop down box) authorized to record and edit this
transaction. Caregiver 1 is the caregiver that created the transaction and this
field cannot be edited. However the transaction can be deleted by a Primary
Caregiver (parent) or by the Referring Caregiver (clinician). If the caregiver is not authorized to
record the transaction, it will not appear to be edited or recorded.
Email
Notify 1-4
– The Email Notify fields define who will be notified (Caregivers or client)
automatically when the transaction is recorded. For most transactions NO caregiver will set to notify. Although
the drop down boxes only select the primary email address (-1) and secondary
email address/text message (-2) of authorized caregivers, detailed editing will
allow an alternative manually entered Email Notify 4 address.
Recording Allowed
Transactions
In
order to give your child credit for completing responsibilities or to charge
them for privileges or negative behaviors, these behaviors or privileges must
be applied or “recorded” to the system. Consistently recording transactions is
critical to behavior management. Negative and positive behavior transactions
should be recorded as soon as reasonably possible to the behavior to discourage
or encourage future behavior.
Recording
a transaction (behavior, privilege, etc.) can be accomplished in several
different ways. You can log into the BMS and select the transaction(s) to
record via the web, you can use emails to record transaction(s) via your
Blackberry™ or you can call the Interactive Voice Response System (IVRS) using
your telephone.
Record
by Phone (IVRS)
The
voice activated phone-based system is perhaps the easiest and quickest way to
record a single transaction.
- Call your assigned
local number. The system will answer and prompt you to say or enter your
PIN code via the keypad. Note: If your PIN code is 9999 (default), it is
disabled and you will not be able to record transactions via phone or
email. Change your PIN code in your profile using the on-line system to
enable these recording methods.
Tip: Program the local number in your cell phone’s
speed dial or contacts list with a name that places it at the start of your
contacts list by inserting a “space”, or “@” symbol at the start. Make sure you
disable call blocking by inserting the necessary codes (i.e. *82) at the start
of the number if you have this enabled on your phone.
- If the telephone number
you are using has been saved in the caregiver or patient profile
registered in the Behavioral Management System, (and does not have caller
ID blocking) it will automatically recognize you. Otherwise it will prompt
the caller for the telephone number that has been registered with the
caregiver. If multiple caregivers and/or child have been registered
with the same telephone number (i.e. home phone), they can be uniquely
recognized if they have different PIN codes.
- After authentication,
the system will prompt you to say the transaction (chore, responsibility,
negative behavior, etc.) or a portion of it. You can say the entire
description, portions of it or a single keyword such as “dog” or “dishes”.
You may also say a type of transaction such as “Chore” and the system will
repeat back all transactions that are the “Chore” type along with any
Allowed Transaction with a description that contains the word “Chore”.
- The system will
identify the best matches, then state the descriptions of the identified
Allowed Transactions in priority and prompts the caller to confirm yes or
no to each of them. Say “No” or press “2” on the keypad if the transaction
repeated back is not correct. Say “Yes” or press “1” on the phone’s keypad
to confirm the transaction is correct.
- The system will then
prompt the caller with “Say Quantity”. Say or enter the quantity of the
transaction to be recorded. Say “point” for the decimal point for
fractional numbers and only say numbers. For example, for $12.53. Say
“twelve point five three” or “twelve point fifty three”. For negative
numbers say “minus” before the numeric value. Negative numbers are used to
reverse entries and are not needed for transactions that normally
are negative (i.e. Withdraw $ from Checking).
- The system will then
repeat back the numeric value and ask for confirmation (“Yes”=1, “No=”2”).
If you say or enter “1” for the quantity, the transaction will be recorded
with no further confirmation required. If you say “No” or enter “2” when
prompted to confirm, the system will prompt again for quantity. If the
transaction was “Get Account Balance” or “Get Point Balance” no quantity
will be prompted.
- After recording the
transaction, the system will reply with “Transaction Recorded”. If the
transaction is set to reply with balances (point or account balances),
these will be played at that time.
- Next, the system will
prompt for additional transactions to record. If you have no further
transactions to record, simply hang up.
Recording
by phone is ideal for recording behaviors in front of your child. It
demonstrates that there will be immediate consequence of their action. It is
hoped that eventually you may only need to pull out your cell phone to gain
your child’s compliance with your commands.
The
phone-based system allows you to quickly get point and account balances. Simply
say either “Get Account Balance” (Checking, Saving and Charity) or “Get Point
Balance” (Points) to the “Say Transaction” prompt. You will not be prompted for a quantity.
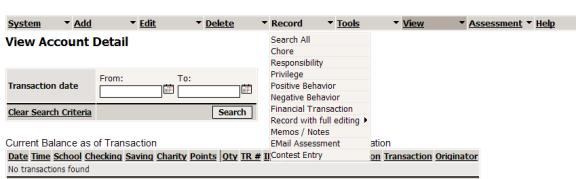
Record via the Web
If
you are recording many transactions at one time, it may be more convenient to
do it on-line. Further, if the transaction needs to be edited in any way such
as value, description or notes added, it must be recorded via the web.
To
record a transaction via the web, the caregiver logs in and selects the child.
Then, using the top menu bar, selects Record, and then selects which type of
transaction to record – Chore, Responsibility, Privilege, Positive Behavior,
Negative Behavior, Financial Transaction, Memos/Notes, Email Assessment and
Contest Entry. See the following picture.
When Chore is selected (for example), the screen will then change to something like this:
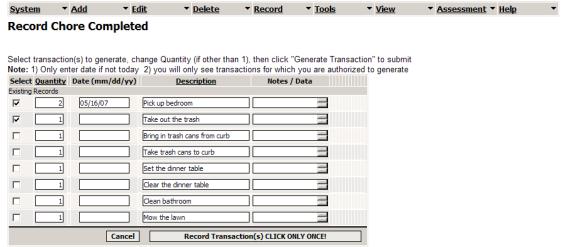
To
record a transaction, click on the select checkbox at the left of the
transaction, change the quantity if not 1. Optionally you may enter a date
(mm/dd/yy) if you want to record the date of the transaction other than today.
You can edit the description or enter notes or comments about the transaction.
This is helpful when relating the circumstance with a therapist in order to do
a behavioral analysis.
You
may also record a transaction while updating many of the preset values. Select
“Record with full editing” and then select the type of transaction to record.
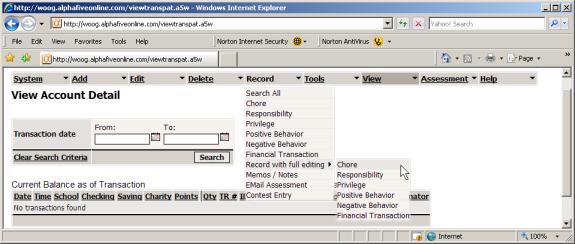
This
allows the caregiver to record a transaction with significant editing to the
Allowed Transaction. The screen will
look more like Edit Allowed Transaction as more fields including the value of
the transaction can be edited prior to recording the transaction.
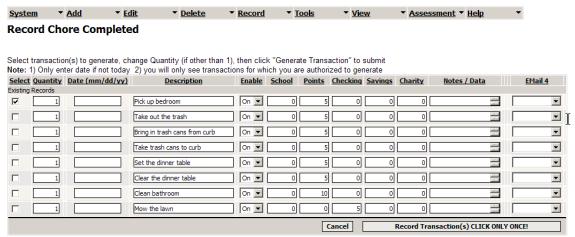
In
addition to the fields of the standard transaction recording, the “Record with
full editing” allows the user to change whether the value is on/off, change the
values of the transaction and select a single caregiver to send notification to
(other than those selected for Email 1-3) via a selection in the Email 4
column.
When you have selected and edited the transactions, click on the “Record Transaction(s) CLICK ONLY ONCE!!” button. You will be asked to confirm. Do so and do not attempt to click the “Record Transaction” button again or it may result in duplicate recordings. Once the transaction has been recorded, the screen will return with an error report in red at the top of the screen. Take a quick check to confirm that the desired transactions were recorded.
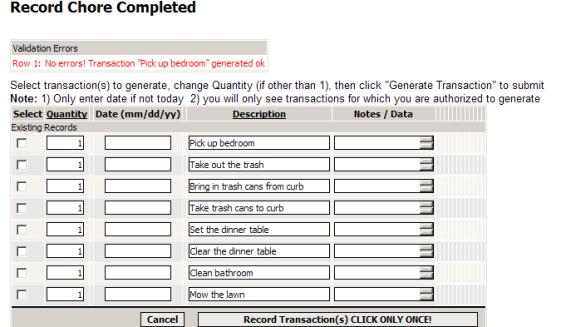
If
there is a message - “Edited transaction not generated”, this suggests that
values for a transaction were changed but the check box was not selected to the
left of the transaction.
Transaction Posting
When the transaction has been
recorded (via web, email or phone), it is placed in a cue to be applied. It
will not appear or have an affect on point or dollar balances until this
occurs. This usually takes between 30 and 60 seconds.
Correcting Recorded Transaction
Mistakes
If
you make a mistake and want to cancel a transaction that has been recorded,
simply reverse out the transaction by recording the same transaction (any
method) with a quantity of –1 (minus
1). If you edited values, you will need to edit the values of the reversed-out
transaction so the net effect on points and/or dollars is zero.
Fine Tuning the Values – Weekly Forecasting
In
order to properly shape behavior, it is important to know the frequency of
current behaviors and the goal (parent’s expectation of behavior) frequencies.
These were setup during the initial assessment when the current estimated and
goal quantity of behaviors were entered for each issue listed (allowed
transaction). These estimates combined
with the point value settings for each transaction will help to quantify the
predicted net weekly effect on the point values. This estimated weekly change
in points helps parents and caregivers know how to set appropriate values for
the various allowed transactions. In general, we are expecting that current
behavior would result in a large negative weekly change and our goal amount
would result in a modest positive change in the balance. This ensures that the
child is motivated to change in order to meet their needs for privileges.
A
forecasting module is provided to easily edit the point values for each allowed
transaction and conveniently view the predicted weekly change. This tool is
used at the start of treatment and periodically thereafter as the current
estimates are updated (using actual data) and goals are changed based on the
changing needs of the parents and child.
There
are two versions of the tool. The first, Weekly Forecast (all enabled),
estimates based on all transactions and assumes that they are all enabled. This is useful to predict the effects of
enabling the values for transactions in the future. The second, Weekly Forecast
(as enabled), predicts the effects based on only the transactions that have
their values enabled. Remember that when the value is off, the transaction can
be recorded but there will be no effect on the clients account balances. This is useful when staging the privileges
and negative behaviors allowing only positive effects on the point and dollar
balances in order to build up a starting balance. Some behavior specialists
recommend this approach although for simplicity we suggest simply starting the
child off with 50-100 points and leaving all transaction’s value setting
enabled from the beginning. This is the default setting during initial
assessment. To access the Weekly
forecast page, simply click on the menu item as shown in the figure below.
The
Weekly forecast page will appear as in the following picture. There are 3
columns that can be edited. The first, yellow column is the Transaction Value.
This value, times the quantity of the transaction recorded, will result in the
total value of the transaction when recorded. The second editable column,
“Current Estimated Quantity”, is the estimate of the number of times each week
the behavior occurs. The column to the
right, “Current Estimated Points” is the net effect on the points for that
transaction each week. The “Goal Estimated
Quantity” is the desired quantity of the behavior. This number should be
realistic as no child will ever be perfect – completing all responsibilities,
chores and never exhibiting negative behavior.

… not all transactions shown in this picture
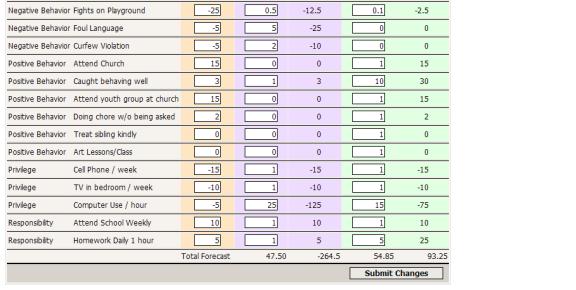
Depending
on the number of allowed transactions, there may be more than one page of
transactions. Note that this illustration shows a negative point balance for
Current Estimated Points and a smaller positive total for Goal Estimate Points. Ideally the current total should be between
–100 and –300 and the goal value should be between +50 and +150. Values are also changed to increase the
relative importance of a behavior or privilege to increase the motivation for change. Values are changed and then the “Submit
Changes” button is clicked. The new values will appear in about 30
seconds.
Special Note about
Allowed Transaction Values
Parents
should be cautioned that past a certain point, increasing the value (positive
or negative) will have no effect and may, in fact, cause discouragement. It can
be expected that behavioral change will occur when the child experiences
the cost of the behavior (for some children multiple times) and not when it is threatened
(i.e. –1000 points cost for positive drug test).